Wireless Home Sensor Network
My colleagues and I have been collaborating on creating a course sequence on TinyML that covers how to perform machine learning (ML) tasks on low-dimensional signal data and integrate ML models into the software running on microcontrollers. As a result, I’ve been spending some time learning how to use the Arduino and Raspberry Pi Pico hardware and software platforms. For example, I’ve been learning how to control LEDs, send data over the serial connection, read and process data from different types of sensors, log data to SD cards, and respond to input from buttons.
Industrial Internet of Things (IIoT)
As part of my preparation, I’ve been able to talk with representatives from several Wisconsin-based companies about their use of embedded systems. Many of these companies focus on advanced and heavy-industry manufacturing. They are generally focused on using embedded systems for predictive maintenance and inventory location and quality tracking, which fall under the umbrella of industrial internet of things (IIoT).
Unmaintained machines increase the safety risks for workers and cause production delays and increased costs due to unplanned downtime. Most companies use planned maintenance schedules based on time or usage volume but those can be inefficient when maintenance that may not be needed is performed and do not prevent all types of failures. By attaching various types of sensors such as temperature, vibration, pressure, and even audio to these machines, they hope to be able to forecast when machines will need maintanance, allowing them to fix issues before they become a bigger and more expensive problem.
One example of an IIoT system architecture might be as follows:
- Small embedded systems placed on the machines collect sensor data. They may be battery powered, so power usage is a significant concern. They may do some light processing such as cleaning or aggregation.
- The sensor nodes transmit the sensor readings to a nearby gateway. The gateway is connected to a permanent power source, so it can perform larger computations and transfer data to cloud systems for storage, aggregation, analysis, and reporting.
Often, the sensors and gateway are connected through a low-power, wide area network rather than standard WiFi and use protocols like MQTT.
Wireless Home Sensor Network
Inspired by the IIoT applications, I decided to build a simple wireless sensor network for my home. I have sensor nodes placed in several rooms that connect to my wifi network and transmit sensor data to a service running on one of my desktops. The data are written to a database, so I can easily load and analyze them in a Jupyter notebook running on the same machine.
Sensor Nodes
For the sensor nodes, I used the following hardware:
- Arduino Nano RP20240 Connect: These MCUs have wireless radios and are compatible with the rest of the Nano ecosystem, which makes attaching sensors and programming them straightforward.
- Arduino Nano Connector Carrier: Provides a Qwiic connector for easy plug and play interfacing with sensors.
- Arduino Modulino Thermo temperature and humidity sensor
- USB Power Adapter for powering the sensor nodes
Data Service
I used Python’s built-in asyncio server capabilities to implement a service that receives sensor readings and writes them to a SQLite database.
Data Model and Protocols
The sensor readings are transmitted over plain text as key-value pairs. The payload includes the MAC address
of the MCU’s wireless radio for identification. Keys and values are separated by tabs, while pairs are
separated by newlines. The end of the batch is indicated by the end keyword followed by a newline. This format reduces the
amount of string manipulation the MCU needs to perform, which helps with reducing memory and processor usage. Here is an example:
mac address\t78:21:84:7A:16:34
temperature\t72.3453
humidity\t56.2341
end
The service guesses the data types, converts the payload into JSON, and adds a timestamp for when the data were received since the MCUs don’t have real-time clocks:
{
	"temperature" : 72.3453,
	"humidity" : 72.3453,
	"mac address": "78:21:84:7A:16:34",
	"received_timestamp" : "2025-10-30T21:51:11.500404"
}
The service then logs the payload to a SQLite database table with the following schema:
CREATE TABLE IF NOT EXISTS sensor_readings (
       id INTEGER PRIMARY KEY,
       event_time TEXT NOT NULL,
       payload JSONB NOT NULL);
Sensor Network Setup
I placed the sensor nodes in three locations:
- Basement: our basement is decently large. We have a washer and dryer in one corner, while the sensor was placed in an adjacent corner next to a dehumidifier.
- Upstairs bedroom
- My office: a “sun room” on the first floor
Data Visualization and Analysis
I only recorded the temperature and humidity from the sensors and performed monitoring for about 12 hours. Nonetheless, the data had some very interesting patterns! The plots below show the temperature and humidity over time:
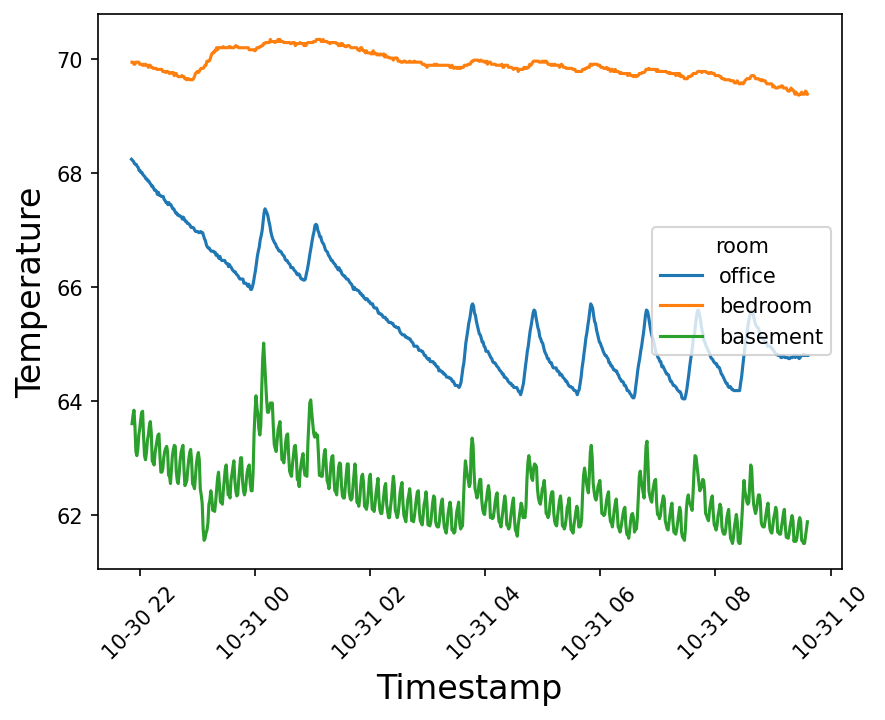
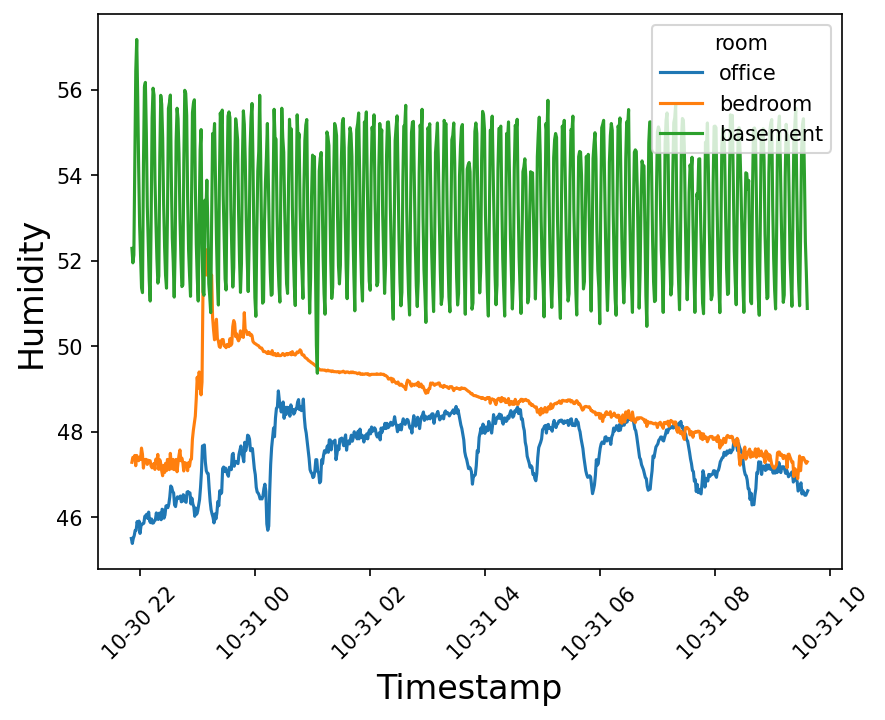
A few patterns are noticeable:
- We can tell my office is not as well insulated as the bedroom. The temperature in the office rises quickly when the central heat turns on and then drops in between.
- In contrast, the bedroom is well insulated with a consistent temperature that drops at a much slower rate. But the central heat doesn’t strongly impact the bedroom temperature.
- It’s clear when the dehumifier in the basement kicks on – the humidity drops. But when the dehumidifer is off, the humidity created by the washer and dryer diffuses over to the where the dehumidifier is. In other words, the dehumidifier is not sufficient to reduce the overall humidity in our large basement, and we probably need to buy a couple more.
- It’s clear when my wife took a shower. The humidity in the bedroom rose sharply at one point and then dissipated slowly. The shower is located on the first floor but there is a laundry chute that connects the bathroom and upper floor, so the steam has a very easy path to the bedroom. The humidity in the office rose more slowly and the rise was delayed due to the time since the steam needed to diffuse across the first floor.
Source Code Availability
The source code for the Arduino sketch and logging service are available in a GitHub repository under the Apache Software License v2.
Conclusion
It’s very interesting and a lot of fun to be able to build physical devices, program them, and then collect and analyze sensor readings from my everyday life! I look forward to bringing these into the classroom, so students can see real-world applications of embedded systems.